This is an old revision of the document!
Table of Contents
Parent Web
The Parent Web Connect access provides the same functionality as the mobile application except for the ability to dismiss students.
Accessing the Site
The specific web address for accessing the information for your school may be obtained from your school staff. Silent Dismissal does not provide this information to parents directly. Once you know the web address for our school, any modern browser, including those on mobile devices, should work.
Creating an Account
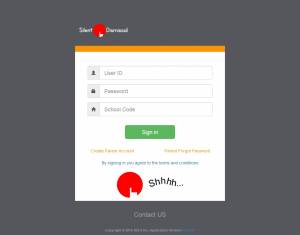 You can quickly determine if your school does not support parent access by navigating to the web page and looking for the orange links titled Create Parent Account and Parent Forgot Password. If these links do not appear, then your school does not support web access and you will be required to obtain the mobile app from either the Google Play store or the Apple App store.
Click on the Create Parent Account to create your account. In order to proceed, you will need to have a valid e-mail address and will need to know the school code and reference code for at least one child. Additional children may be added after your account is created.
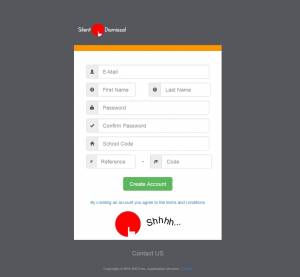 Enter your e-mail address in the first field. This will be your account ID and will be used to send your password in the event you have forgotten it. Each e-mail address may be used only one time. If you have already registered an account with your e-mail address, you will need to recover the password for that account as a new account with the same e-mail address cannot be created.
Enter your first and last names into the appropriate fields.
For the password, choose something secure but also something that you will be able to easily remember. Do not reuse your password from other accounts, in particular from any financial or mail accounts that you may have. Silent Dismissal stores these passwords in unencrypted text so that we may send your password to you via e-mail in the event you have forgotten it. For this reason, it is important to use a distinct password for your Silent Dismissal Parent Connect account.
You will need to enter your password two times to ensure that you have entered it properly. Do not include any spaces in your password.
The school code may already be filled in for you on the page. If it is not, you will need to obtain this information from your school. Type the code in exactly, noting the specific usage of uppercase and lowercase letters.
The combined Reference-Code fields are associated to a single student. It is not possible to register for an account without having a valid student Reference-Code. Student Reference-Codes are used to associate students to accounts. Protect all of your student Reference-Codes as you would something like your bank card PIN as anyone with the code can access associate your child to his or her account.
After the information has been entered, press the Create Account button. If everything is correct, you will be directed to your portal page. If not, read the error information provided then try again.
Portal Page
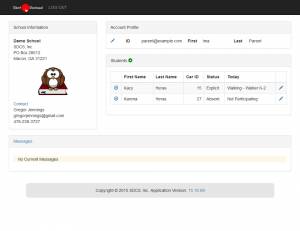
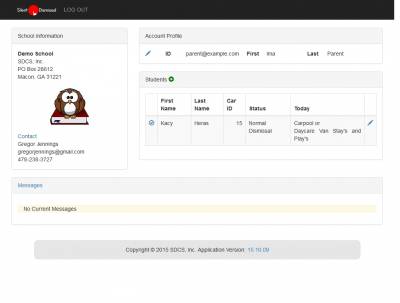 Your home portal page is comprised of four informational areas with four main functions that may be performed.
The four areas are:
- School Information
- Account Profile
- Students
- Messages
The four functions that may be performed are:
- Edit Account Profile
- Add Students to Profile
- Edit Student Profile
- Set Explicit Dismissal for the Current Day
School Information
This block contains information that you cannot change. It is information provided by the school such as the school name and address, along with the primary contact for supporting Silent Dismissal.
Account Profile
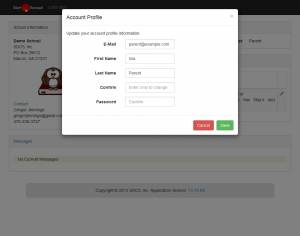 This is you information. It shows your e-mail address and your name that you entered when you created your account.
You may click on the pencil icon to edit your account information, including changing your password. This is the first of three functions that you may perform.
Students
 The Students section lists all of the students associated to your account. By default, when you first create an account there will only be a single student listed.
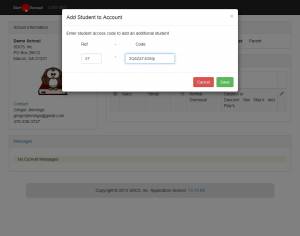
The second function you may perform is to add students to your account. Click on the green plus indicator to add an additional student. In order to add an additional student, you will need to have the student Reference-Code. After entering the reference code and pressing Save the student section will update with the current students. If a new one has been successfully added, he or she will appear here. If an error has occurred, a yellow message will appear at the top of the screen.
Columns
Each student is shown with seven (7) columns. The first and last of these are hyperlinks to Set Explicit Dismissal and Student Profile, respectively. Each of these are discussed in more detail later.
The First Name, Last Name, and Car ID should be self explanatory. Depending upon the settings for your school, you may be able to edit these values on the Student Profile page.
Status Each day, the status for every child reverts to Normal Dismissal. In this configuration the child will always have Carpool available and may have one or more group assignments.
If your child is configured only as a carpool car rider for the current day and will be riding in carpool today, then no action is required.
Similarly, if your child is configured for only a single group for the current day and that group assignment is correct, then no action is required.
The status value will change when specific information about the student is entered.
Today The Today column displays the current assignment for each child for the current day. When Normal Dismissal is in effect, the child will always show Carpool as an available dismissal method. As many different groups the child is assigned for the current day will also show.
If an Explicit setting has been made for a child, only that specific value will be shown in the Today Column
Student Profile
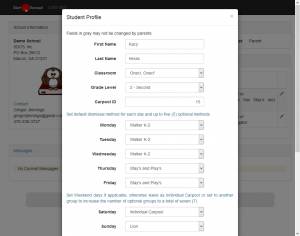 The third function that you may perform is to set the profile for each student associated to your account. The icon in the right column of each student row is a link to the Student Profile. If one or more fields may be changed by parents, this icon will appear as a blue pencil; if no fields are editable by a parent, then this icon will appear as an orange access denied icon.
The Student Profile pop up is divided into four sections. The first section displays general student information including: name, classroom (A only for A/B schedule schools), grade level, and carpool ID.
The second section has five (5) drop down selections for defining the default end of day procedure for the child for each weekday.
The third section is similar to the second section but applies for weekend days. If the school does not have any normal classes on weekends, then these two days may be used to supplement the list of optional groups.
The fourth section is for configuring additional optional groups. These are groups which will not be the default for any specific day, but may be used to set an explicit value on any day.
How to Use
The day of the week values are persistent, i.e., once set they become the default dismissal method for that day of the week from the time they are set until they are optionally changed in the future. These settings should reflect the norm for each student.
For example, assume that a student normally rides a bus home from school each weekday, but in rare occurrences the student may need to stay after school for after care because the parent won't be home that day when the bus would normally arrive. For this child, set the value for each day Monday through Friday to the bus, then set the first optional method as the after care group.
On normal days, no action by the parent is required; but on days when a change is required, the parent may select the Set Explicit icon for the child then click on the after care group to set that as an override for the current day. If the after care group is not set up as an optional group, then it will not be available on the list of explicit options.
In most cases these values may be set once a school year or once a semester then remain in effect. When a significant change in the family does occur, the values may be updated as the new procedure from that point forward.
Any field marked in gray and showing a do not enter cursor when hovered over may not be changed by parents. This may be because school policy does not allow parent to change those values, or in the case of specific days the current time may be too close to dismissal to allow parents to change the value for the current day.
Explicit Dismissal
Explicit Dismissal is a powerful tool to allow parents to make changes to dismissal procedures without the need for writing a note in advance or otherwise contacting the school directly. This is the fourth, and final, function you may perform.
The Explicit Dismissal icon is located in the first column of each student row. The icon may appear as one of three different images. The most common is a circle with a check mark in it. This indicates that changes may be made for the student. The next most common icon is a red clock. The red clock indicates that the current time is later than school policy allows for changes so Explicit Dismissal settings may not be changed for the current day. The final icon is an orange do not enter symbol that indicates that the school does not allow parents to set Explicit Dismissal values directly.
Options
Each student always has five (5) Explicit Dismissal setting available followed by each group for which a child is a member on any day of the week or as an optional group. These options are as follows:
- Absent the student will not appear on any classroom monitors nor on any group or location load lists
- Left Early similar operation to Absent but applies to students who were present for some of the school day
- Normal Dismissal this is the default setting each day. This option may be used to clear any previously set values
- Carpool Only the student name will appear in the classroom only when the student's carpool number is entered for dismissal. The student will not appear when any groups are called for dismissal and will not appear on the load lists for any groups
- Alternate Carpool provides a method for students to easily ride home with a friend on any given day. To use this setting, the parent must know the carpool number that the friend's parent will display at the end of the day. The student will see a message in the classroom indicating that the student is departing for an alternate carpool and will see the number of that carpool
- All other groups Selecting any specific group will override any existing group settings for the day. If a student is normally assigned to a bus group for the day but an explicit setting is made to set the student for the after care group, then the student will only see his or her name when the after care group is called. The student will appear on the check in roster for after care but will not appear on the check in roster for the bus.
Messages
The messages section will show all messages posted in the school on the current day that apply to the primary classroom to which the listed students are members, that apply to any group associated to any student for the current day, and that apply to the entire school.
Data Logging
 All transactions performed on a student record are date and time stamped and associated to the specific account which made the change, whether that is a parent account or an account for a school staff member.
This includes the overall configuration for groups in the Student Profile and each Explicit Dismissal setting that is made.
If any questions arise concerning the dismissal activities for a student on any day, school staff have the ability to research the settings applied for any given day.
As shown on the display at the left, the current settings for each student are also available to any parent account that has the child as an associated student.
