Table of Contents
Dismissal Locations
Dismissal locations are named places to which students are directed. They may be broad descriptions such as Car Line, Blue Door #5, or North Parking Lot. They can also be very specific locations such as Car Line Cone A, Car Line Cone B; or they may be locations inside the building such as Main Office, Media Center, or Cafeteria.
Parent Pick Up Locations
Some locations may be appropriate for parent entry for dismissal from the Parent Connect All Access app. In order to enable a location for parent entry from the app, it is necessary to bound the entry area geographically using latitude and longitude values.
It is also necessary enable parent dismissal from the app by going to Tools / School Settings and setting the Parents / Dismiss value to Yes.
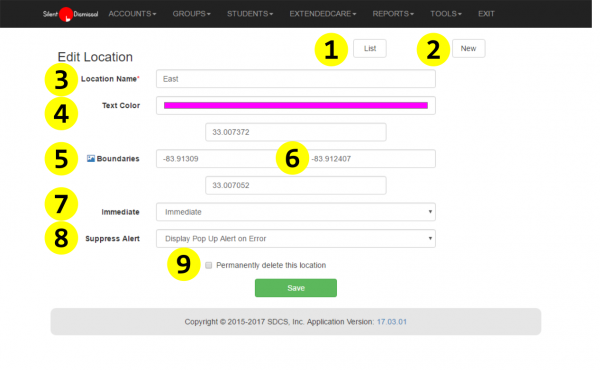
- List button - return to the list of defined locations
- New button - clear the form to allow for creation of an additional location
- Location Name - the text that will appear adjacent to the student name when the student is call for pick up
- Text Color - the color in which the location name will appear on the classroom screen
- Boundary Map button - press this button to view the defined boundary on a Google map page. This button uses the most recently saved values; to view changes entered in the boundary boxes it is necessary to first save the location. Changing the values on the right then pressing the icon without first saving the record will not accurately display the coordinates listed.
- Boundary values - the edges of location boundary where parents may call students for dismissal to the location. These are the north and south latitude and the west and east longitude. These values must be in pure decimal format, not minutes/seconds or minutes/fractional minutes
- Immediate - when a location is designated as an immediate location students called to the location will appear in the classroom when entered and will not be withheld from display until the normal student display time
- Suppress Alert - inhibits the display of the pop up alert message box for significant problems on the pick up ID number entry screen used by dismissal staff
- Permanently Delete checkbox - this appears only for existing locations, not when creating a new location. If checked, when the save button is pressed the location will be permanently deleted. There is no method for restoring a deleted location other than to reenter as a new location
Determining Latitude and Longitude Values
The easiest way to determine latitude and longitude values is with [https://www.google.com/earth/download/ge/agree.html|[Google Earth]].
Once Google Earth is installed and started, go to Tools / Options then locate the section titled Show Lat/Long and select the radio button for Decimal Degrees and press OK.
Now type in the name of your school in the search box at the top left of the screen to view your school. Position your mouse at the top left of the rectangular area in which you wish to allow parents to enter dismissal information. Write down the lat and lon values displayed on the bottom right of Google Earth. When viewing a school in North America, the lat value will be positive and the lon value will be negative. Repeat this step by positioning your mouse pointer at the bottom right of the rectangular area to define and again write down the coordinates.
Remember when defining the entry area for the car line it is advisable to allow entry upstream of the actual loading area; when defining an area for walk up, this will usually be only a small area immediately adjacent to the school building.
Entering the location values in Silent Dismissal
As an administrator go to Groups / Location to see a list of defined locations. Click on the name of a location for which a geo boundary will be created.
On the following page, in Boundaries section enter the coordinates from the prior step.
In the first row, enter the lat value from the first set (top left) of coordinates .
In the second row first field, enter the lon value from the first set (top left) of cooridinates. Ensure this value is negative.
In the second row second field, enter the lon value from the second set (bottom right) of coordinates. Ensure this value is negative.
In the last row enter the lat value from the second set (bottom right) of coordinates.
Now press the Save button and the boundary for the location has been defined.
Update these coordinates as required to change the location.
Removing A Location from Parent Entry
To remove the ability for parents to dismiss to a listed location, remove the lat and lon boundary values.
Verifying Operation
Web
Once a set of coordinates has been entered and the location record has been saved, an icon will appear to the left of the label Boundaries. Click on that icon to open a new tab that will overlay the coordinates on a Google maps page.
Mobile App
To verify the location of the geo boundaries, install either the iOS or Android app on a device then create a parent account. You can create a dummy student record for this or use any existing student record.
Upon signing into the app, the first screen will be the dismissal page. Click on the map view icon on the top to use satellite images to more clearly see the school.
Each location with a geo boundary will appear in the drop down list immediately below the map. Select each of these locations to zoom to the defined location and view the geo boundary.

