Table of Contents
Overview
This page contains information for Administrator (also referred to as local admin) user accounts. Each section of this page will refer to the corresponding drop-down menus from the navigation bar at the top of Silent Dismissal when accessed by a local admin account.
Accounts Menu
The accounts menu contains links to pages that allow a local admin user to interact with the user accounts associated with the school.
ACCOUNTS / NEW
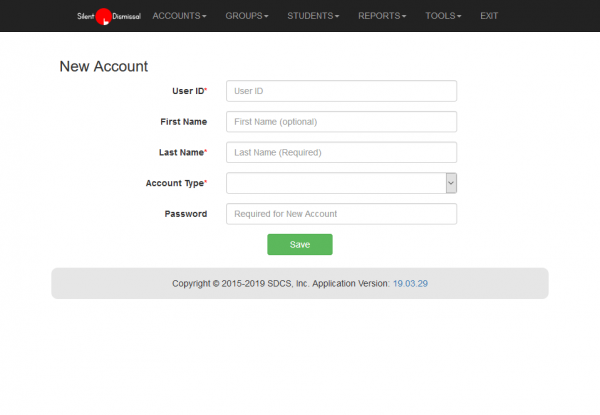
To manually create an individual account, navigate to the page referenced above by clicking on ACCOUNTS and then NEW from the drop-down menu. Fill in the form with the appropriate information to create a new user account. Each line of the form should be self-explanatory, with the account type requiring the most attention and understanding.
There are five different account types:
- Local Admin
- Classroom
- Dismissal
- Extended Care
- Kiosk
The Local Admin account type has the most user permissions. The user of this account type will be entrusted with maintaining and managing the school's Silent Dismissal database, which will require a greater knowledge of the application compared to their colleagues. While Silent Dismissal's support team will be available for contact and troubleshooting, Local Admin users can perform a variety of tasks with their permissions. We encourage faculty & staff with access to these accounts carefully read our documentation to avoid unnecessary support contact.
The Classroom account type should be used by faculty & staff that are teaching students in classroom settings. The information available through this user account type refers to student's attendance, participation, etc. and assists with arrival/dismissal of students.
The Dismissal account type should be used by faculty & staff that perform arrival/dismissal duties. The information available through this user account type refers to the school's arrival/dismissal system, including locations for pick up and zones both which can be setup by a local admin user (usually performed during the initial setup of the school's database).
The Extended Care account type should be used by faculty & staff that are involved with the school's extended care program(s). The information available through this user account type refers to the check-in/check-out process for extended care, including documentation of charges for each student.
The Kiosk account type is used to create a number pad to use at dismissal locations. At this time, there are no other purposes for this account.
ACCOUNTS / LIST
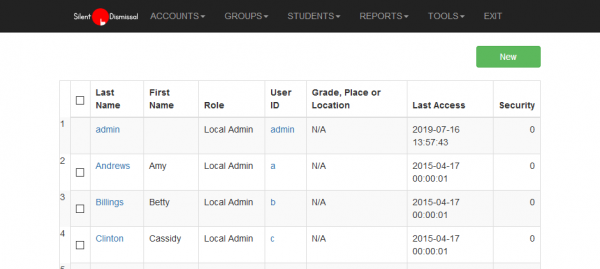
 From the navigation bar, select ACCOUNTS, and then LIST from the drop-down menu. This page shows a detailed list of all user accounts: first and last name, role, user ID, grade/place/location, last access, and security count limit.
While viewing this list, an admin may select any of the user accounts by clicking on the value in the “Last Name” column which will direct them to the account edit page. From this page, the account may be edited, deleted, or change the view to mirror the user account selected. To quickly swap to another account's view, select the value from the “User ID” column.
In the “Role” column, each account's user type will be listed. If the account is a Classroom account, the number of students on that account's class roster will be displayed (appears as Classroom[#]). When the value is selected, the web browser will direct to another page to list each student on the roster. The student's first and last name, grade, pick up id, and dismissal groups will be displayed.
The “Grade, Place, or Location” column will display information depending on the user's account type. Classroom accounts will display the grade that user teaches, Dismissal accounts will display the location or zone that the user is designated to monitor, Kiosk accounts will display the location or zone where the kiosk is located, and Extended Care accounts will display the location where activities are being held.
“Last Access” and “Security” columns are useful when local admins need to check the activity of each user account. “Last Access” will display the date and time of the account's latest access, which can be beneficial for verifying a faculty or staff member has the ability to access their account after creation. “Security” refers to the security count limit, a set number of log-in attempts to avoid security breaches within your school's database. For example, if an intruder submits the incorrect password consecutively for an account, the account will be subsequently locked and the password must be changed. Account users may be locked out accidentally if they submit the incorrect password consecutively as well, however a local admin may issue a new password through the account edit page.
It is recommended that account users change their newly issued password to avoid unauthorized entry.
ACCOUNTS / BULK LOAD
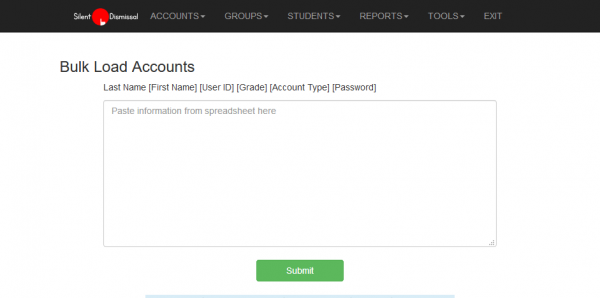
User accounts can be created by loading information in bulk from a spreadsheet by selecting ACCOUNTS, and then BULK LOAD from the drop-down menu. The page should look similar to the screenshot to your right.
To perform an account bulk load, you must generate a spreadsheet with the data necessary for each account. Please refer to the Spreadsheet File Formats for formatting instructions or download a preconfigured spreadsheet and enter your data.
Once the spreadsheets are prepared with the correct formatting, then they may be loaded into the database for you school through Silent Dismissal.
ACCOUNTS / DISPLAY
This page will show the classroom display settings.
Groups Menu
Testing and Training
It is possible, even recommended, to perform a test within the school prior to actual use. Testing and Training instructions
Special Configuration
Some schools need to accommodate special situations such as:
- Younger Students Ride Home With Older Students
- Younger Student Walk Home with Older Students
- Staggered dismissal times based upon grade level
- Siblings waiting for older students in holding area
- Remediation (Tutoring) during dismissal
- Special Classes - Art, Music, Media Center - that have different students by day of the week
- Early Release for some students, e.g., Safety Patrol
- More
Special Configuration methods are described here.
Initial Set Up
Initial set is quick and easy. An entire school of over 1,000 students can usually be configured with less than one hour of total work.
Check out the welcome page.
A comprehensive step-by-step checklist is available to guide you through the process.
We've even written sample letters for staff and parents that can be sent via e-mail or printed.
School Settings
School Settings generally need to be only when first using Silent Dismissal. These settings include the time zone, the time students are dismissed, uploading an optional school logo, and a few other optional settings.
Staff Accounts
Staff Accounts can be readily created by copying an pasting from a list in a spreadsheet, creating all of the necessary accounts in less than a minute.
Students
Student Records may be copy and pasted from a spreadsheet, again loading all of the students in less than a minute.
Groups
A multitude of group types are available to coordinate all after school movement of students. Each type of group offers different features. After the groups are created, students may be assigned to each group.
Dismissal Locations and Zones
Dismissal locations are physical places in the school where students may be directed to walk to. Zones are a special type of location in which multiple locations are logically grouped together and are almost exclusively used for car loading.
Parent Accounts
Parents must create their own accounts in order to gain access.
Parents sign in to both the mobile app and the web portal with the same user ID (e-mail) and password. If a student is associated to a parent account from either the portal or the mobile app, the student association becomes available when accessing the account via the other method.
Obtaining Access
Web
Parent access via the web may be disabled complete by going to TOOLS / SCHOOL SETTINGS, open the section titled Parent Settings then set the value in the option Web Access.
If web access is permitted by parents the interaction with the student settings must be explicitly granted by the school. This may be done by going to STUDENTS / LIST ⇒ <letter of last name> ⇒ <student last name> then setting the Web Connect option to Enabled or by going to STUDENTS / WEB CONNECT and granting or revoking access to multiple students. The ability to grant web access for a student is limited by the quantity of WCL Web Connect Licenses purchased by the school.
Mobile App
The features available initially to parents with the mobile app are extremely limited. Access to all of the features is provided by obtaining an “All Access” pass for the app.
Parents may purchase this themselves via an in-app purchase, or access may be granted by the school. School administrators may grant “All Access” to a parent mobile account by navigating to REPORTS / ACCOUNT LIST. This list will show all of the parent accounts that exist, the number of associated students, and whether or not they have an active “All Access” pass to either the Android or Apple application. To grant the access, click on the plus button in either the Android or iOS column. Each time an “All Access” pass is granted to a parent account the number of available AAL All Access Licenses will be decremented by one. When all of the available licenses have been allocated it will be necessary to purchase additional licenses from Silent Dismissal before they may be granted to parents.
Alternating Schedule
The AB Schedule provides a method for having two alternating schedules.
Yearly Conversion
To prepare an existing site for the new year, follow these steps.
Override
Overrides are used to set a specific dismissal for a single day, as compared to the day of the week settings that persist until changed.
Overrides may be performed by parents for their own students, classroom teachers for the students assigned to their classroom, and by administrators who may set or clear the override for any student.
Menu
The Admin Menu is the principal means of navigating the application. View the Admin Menu page to review all of the menu items.
Reports
Administrators can use reports to verify roster information; to identify problems in information entered, to analyze performance of students, staff, and parents; and to improve the dismissal process.
Help Pages
List of Admin Help Pages
Table of Contents
Menu
- Accounts
- Groups
-
- Group Types
- Extended Care (only for schools with extended care licenses)
- Students
- Extended Care (only for schools with extended care licenses)
-
- Reports
- Reports
- Roster
- Parents
- Data Review
- Transactions
- Tools
- Print Tags


